Monday, November 26, 2012

Hacking Beyond The Browser with BeEF (Robbing Your Wireless Keys)

Pauldotcom has a very interesting post on “Retrieving Clear Text Wireless Keys” from Compromised Systems” at http://pauldotcom.com/2012/03/retrieving-wireless-keys-from.html
As mentioned in the post, this works on Windows Vista and 7.
I have written a BeEF module called “Get Wireless Keys” which automates the process of robbing the victim of the wireless keys using a signed Java applet.
Follow the steps listed on https://github.com/beefproject/beef/wiki/BeEF-and-Backtrack-5  in order to download BeEF.  My module is now available in the repo.
If you are new to BeEF, you can find some video tutorials here. https://github.com/beefproject/beef/wiki
This will act as a bridge to allow hacking beyond the browser as you will easily be able to compromise other systems in the network once you  connect to the victim’s wireless networks using the stolen wireless keys on your computer.

Upon launching the module against the victim, the victim will get a popup on his browser.  The victim would need to click “Run” in order for this to work.

You will see the below output in the console of BeEF. This means that the victim’s has executed the java applet and the applet has returned some results.

In the below screen shot, it shows that the wireless profiles on the victim’s computer has been saved to /pentest/web/beef/exported_wlan_profiles.xml

The next thing that we need to do is to import the wireless into your Windows Vista/7 computer.

You should be able to connect to the wireless networks that have been saved on the victim’s computer without any password prompts.
You might want to use this module together with “get physical location” module that I have written to identify the actual location of the wireless access point that the victim use in his home or office.
Thats if you are within close proximity to the victim. If not, this module is useless to you.
Alternatively, you could mass mail to all emails address that you can find that belong to a domain with the link to beef.
If you are using Preshared Keys instead WPA/WPA2 enterprise in your organisation, then all you need is one person in the organization to click Run to the Java Applet alert popup to get pwned.

Sunday, November 25, 2012

Hack Remote Computers using PRORAT


Hi guys..today i am going to show you how to set up ProRat and how to hack a computer using it. Well, i am going to finish up RAT setup articles with this. I will give the counter measures in my next article. As i haven’t written any articles on direct connection Trojans, I decided to write the one on PRORAT.
If you are new to RATing, it is strongly recommended to read my previous articles which give you all the basic and advanced stuff about RATs.

Hack Remote Computers using EXTREME RAT
Trojans and RATs- Know The Facts
DARK-COMET v4.2 RAT TUTORIAL

procedure to setup ProRat

STEP 1. First of all Download ProRat from here. Once it is downloaded extract it. A password prompt will come up. Enter the password.The password  "pro".

STEP 2. Open up the program and You should see the following window.


STEP 3. Click on the "Create" button in the bottom. Choose "Create ProRat Server".


STEP 4. Next put your IP address so the server could connect to you. You need not enter your IP address manually, you can do this by just clicking on the little arrow. it automatically fills your IP address.
Next put in your e-mail so that when and if a victim gets infected it will send you an email.


STEP 5. Now Open General settings. This tab is the most important tab. In the check boxes, we will choose the server port the program will connect through, the password you will be asked to enter when the victim is infected and you wish to connect with them, and the victim name. As you can see ProRat has the ability to disable the windows firewall and hide itself from being displayed in the task manager. Just follow the steps as shown in the figure.


STEP  6. Click on the Bind with File button to continue. Here you will have the option to bind the trojan server file with another file. You can select an image, text file or pdf file, So as to make the victim trust your file.


STEP  7. Click on the Server Extensions button to continue. Here you choose what kind of server file to generate.    I prefer using .exe files.


STEP  8. Click on Server Icon to continue. Here you will choose an icon for your server file to have. The icons help mask what the file actually is.


STEP  9. After this, press Create server, your server will be in the same folder as ProRat. Start giving this file to your victim. When the victim double click the file, his computer will be in your control.


STEP  10. Now the hacker has lot of options to choose from. He can do many funny things with the victim’s computer.


NOTE: In this tutorial, i put the victim’s IP as 127.0.0.1 as i am testing it on my computer. Inorder to hack a remote computer, you need to get the IP address of your victim. If you dont  know how to find an IP address, you can read my article on finding out remote IP address from here.

How to hack an IP address of a remote computer


Hope you enjoyed the tutorial. Feel free to leave your comments for further doubts and clarifications.

Friday, November 23, 2012

Android SDK Tools, Revision 21

Along with the Android 4.2 SDK,  also launched a brand new update of the Android SDK Tools (Revision 21). The update includes new tools and capabilities that can help you work more efficiently as you create applications. Tools such as a new multi-config editor, and new Lint rules will help you develop apps more quickly, while a new UI test framework will give you more ways automate testing and QA for your apps. For new developers, one-click SDK download and new app templates help you get started more quickly.

Multi-config editor

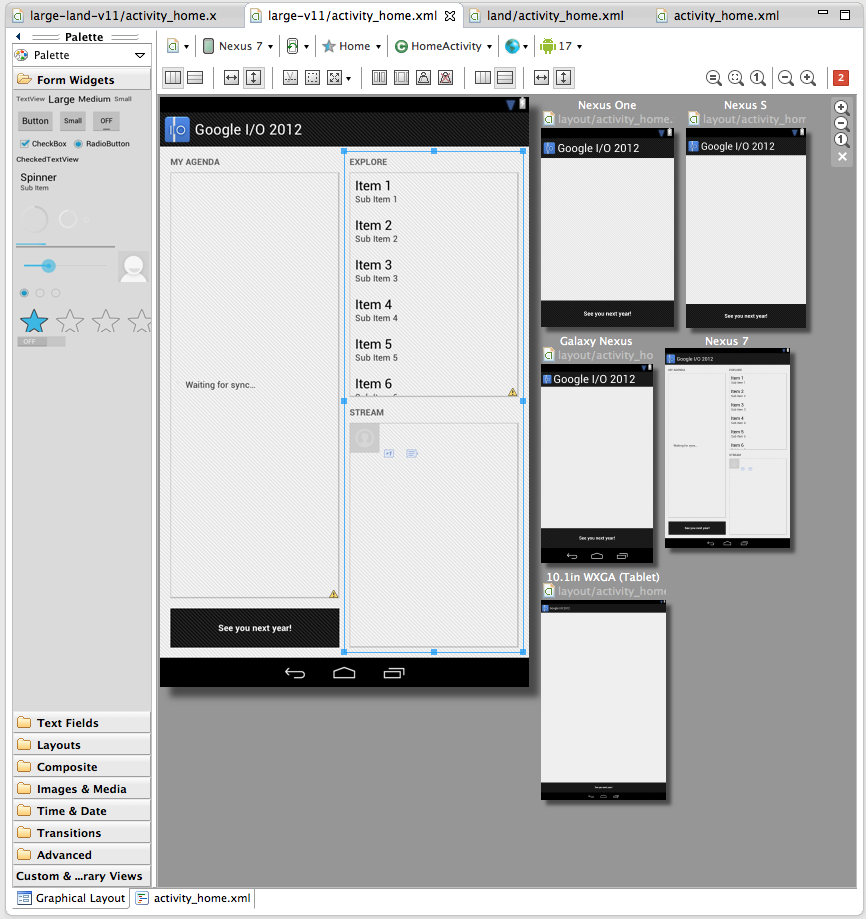
A new multi-configuration editor allows you to develop and prototype your UI across various orientations, screen sizes and locales. For example, while editing your layout in portrait mode, you can see if your edits aren't visible in the shorter landscape orientation. You can see previews for other screen sizes from small phones to large tablets, you can see previews for the layout using all the available language translations in your app, and so on. You can even see how the layout appears when it is included as a fragment in a different larger layout. Finally, Android allows you to create specialized layouts for any of these configurations, and the multi configuration editor shows you these overridden layouts.

Here is a screenshot of the layout editor showing one of the layouts from the Google I/O application, across a variety of screen sizes.


More app templates

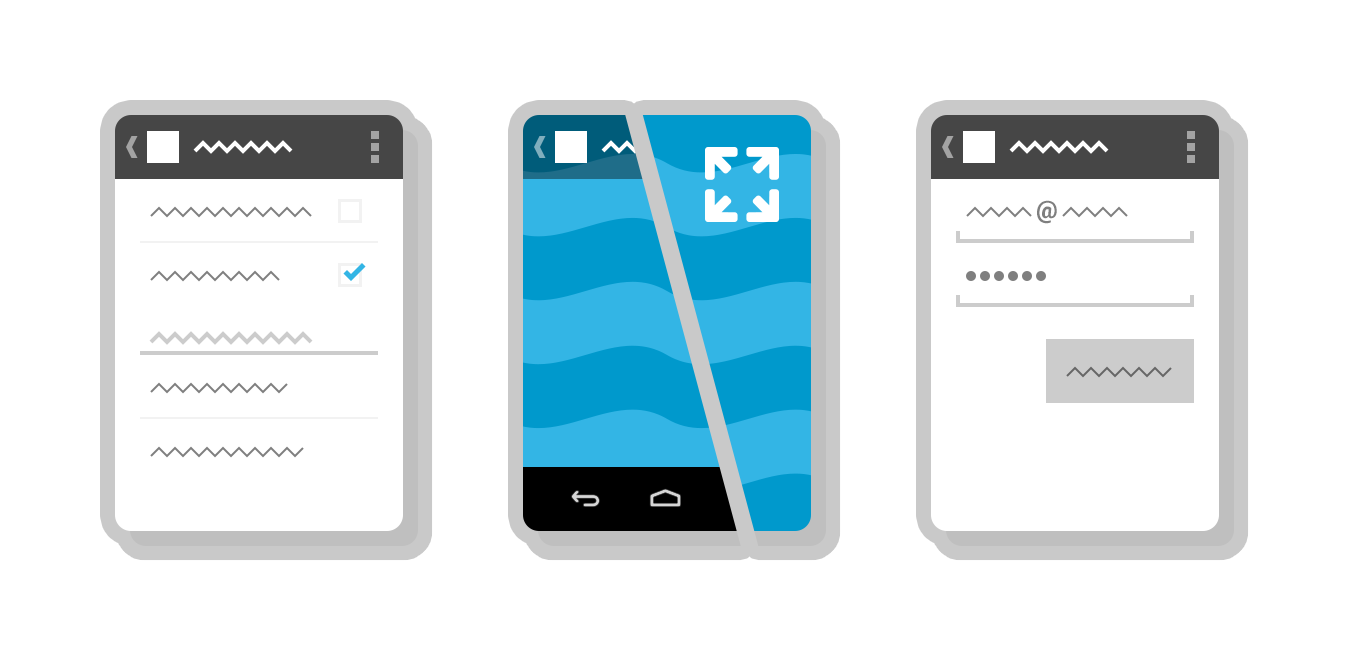
Tools R21 brings three new app templates to help you to easily add new screens to your app. There’s a new full-screen activity for use as a photo or video viewer, a settings activity to handle basic user preferences and a login activity to capture username/password.


UI Automator Test Framework

One common approach to UI testing is to run tests manually and verify that the app is behaving as expected. UI Automator is a new software testing framework available in Tools R21 that provides you with tools to easily automate UI testing tasks. It provides a GUI tool to scan and analyze the UI components of an Android application (uiautomatorviewer), a library containing APIs to create customized functional UI tests, and an execution engine to automate and run the tests against multiple physical devices. UI Automator runs on Android 4.1 (API level 16) or higher. To learn more head over to the UI Testing documentation.

One-click SDK installer

New Android SDK developers now have a convenient way to download all the various SDK components like Tools, Platform Tools, Eclipse ADT, and the latest system image with a single click. Existing developers can continue to manage their SDK components and get updates through the SDK Manager.

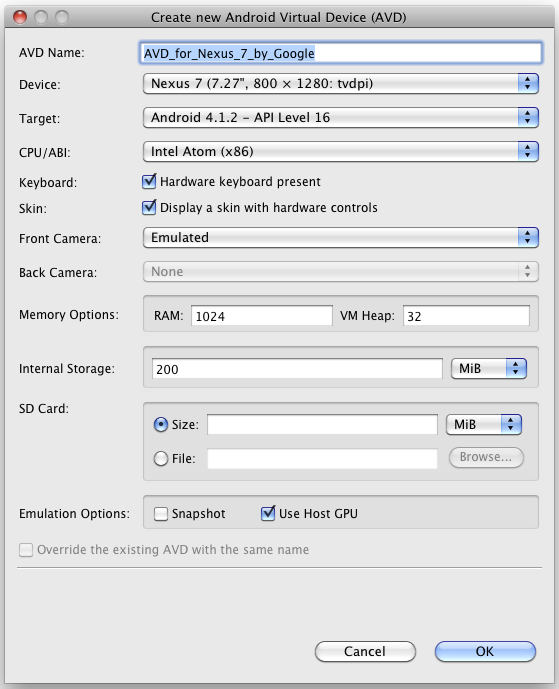
Revamped AVD creation dialog

The new dialog makes it easier to create Android Virtual Devices (AVDs) matching real device profiles. The AVDs will also appear in the layout editor to show you how the layouts will look.


More Lint rules

And to wrap things up there are 25 new lint rules which catch several common sources of bugs, for example deviations from Android design guide for icons, checks for mismanaged wakelocks, common sources of locale-related bugs and so on. So make sure you upgrade and let Lint loose on your projects before your next app update!

A minor bug-fix to the Android NDK is also available. For a complete list of what’s new, see the release notes for SDK Tools R21, ADT 21.0.0 and Android NDK R8c.

How to Recover Data from a Crashed Hard Drive

Today, we will help you how to Recover Data from a Crashed Hard Drive. When your PC switch off suddenly due to any hardware failures or software error problems. If you are regular computer user; you may know that a hard drive failure is an unpredictable situation. It happens very often that your hard drive gets crashed and you ultimately lose you precious saved data and files leading to great discontentment and grief. It's really a worst condition when you are working on an important file or data or picture etc and suddenly everything gets blank and Oh God, your hard disk breaks down. And it becomes even more critical when you don't have any backup installed in your computer at all.
Though crashing hard drive means total data loss from your computer system but now with the advancements in IT technology, it has become possible to recover your data or file or work when the hard drive stops booting. There are various methods with which you can recover your important data and fix the problem at the ease of your own comfort without waiting for the technician to come. Here I am discussing how to recover your data from a crashed hard drive. Some times your pc may crash due to virus attacks. So in order to avoid such situtatuions you need to secure your pc with good antivirus softwares.

The first step to be taken for solving the problem is to take out the crashed hard drive from the system. Then install this hard drive in another computer as a secondary drive having Windows installed on it. After it, boot into Windows and install PC Inspector File Recovery. The software is available at free of cost and we provided the download link of the application at the end of the article. But always install it on the primary drive to avoid the over-writing of files you are going to restore. After downloading the PC Inspector File Recovery, open it and select the language. The software is compatible for all windows versions xp/vista/7 and windows 8. A welcome screen will appear with having three options in it:
Recover deleted files

This option enables you to restore only those files which have been deleted permanently from your drive and have not been over-written yet.

Find lost data

By choosing this option, you will be able to recover the data which has been lost as a result of hard drive crash. With this option, you will further get two more options of "start cluster" and "end cluster". It's better to leave the scanning process of entire drive as it takes a long time depending on the size of your drive.

Find lost drive

It is the third option which should be used when you don't see your drive letter in my computer or windows explorer. This option will help you connect the drive and to find your lost data.

But in the case, if there is no secondary computer to work with, go for the Ultimate Boot CD for Windows. With the help of UBCD, you will be able to boot into Windows which will then run utilities on the damaged drive that will help you solve the issue. With UBCD, you gain an access to various utilities and PC Inspector File Recovery is also one of them which can be run on the system from a CD. For creating UBCD for Windows, you require a PC with Windows XP and XP Installation CD. To keep your crashed hard drive into the freezer is also a successful method to recover the data or files. Download Here

If all of the above mentioned methods not work, It's time to send your hard drive in the hands of a computer technicians who will use any data recovery tool or apps to help you recover your lost data successfully. However, you may also search for a data recovery software online and get it installed on your computer system.

Hard drive crash is a common problem that can happen with anybody at any time. So search for the right option and save your precious data and files from getting corrupted.

Download Link for PC Inspector File Recovery

Install Android ICS 4.0.3 XXLPJ Firmware on Samsung Galaxy S2 GT I9100

Here is another tutorial how to Install Android ICS 4.0.3 XXLPJ Firmware Update on Samsung Galaxy S2 GT i9100. Samsung Galaxy II got the Official XXLPQ Firmware update recently. But the Firmware had some bugs and users reported it. Samsung revived the Android 4.0.3 and added some other latest features like fast focus; taking photos while video recording etc in this new firmware package. The new XXLPJ firmware rom not only resolves the issue but also brings many features and tweaked performance to Galaxy SII. It was leaked firmware version not officially announced by the Samsung. On previous XXLPQ firmware users were disappointed due to faster battery drain problem without any usage. Let’s hope on this XXLPJ Firmware there will on more issues like that, as per the feedback of this rom update people were quiet satisfied with the performance and no lags at all. Better to check always OTA or Kies on your device there will be special updates available for particular regions. We are providing here detailed tutorial to install the firmware using Odin.

Disclaimer: If your Samsung Galaxy S II get damage during the process then neither we nor developer is responsible for that. Although, this ROM is tested by us but do it on your own risk. We have tested this procedure and it works well for us without any problems. Pre-Requisite:
It is quite essential for you to go through all the instruction mentioned in this article in order to complete the updating process successfully.
1. The basic requirement for this process is to have a Samsung Galaxy SII GT i9100, windows based Computer and a USB data cable.
2. It is recommended to create the complete backup of your Samsung Galaxy S XXLPJ via clockworkmod or you may lose all the important data present on your device during the update. We are providing you the list of data or files, which you must take backup of all them.
3. Call logs, contacts, Bookmarks, images, music, videos, SMS, MMS settings and APN (Access Point Names) settings etc.
4. Up to 60% of battery power is required for the successfully completion of the update process. Less than this may conclude in incompletion of process due to power issues.
5. Please ensure that you have disabled your Antivirus or firewall on your Computer and uninstalled the same from your Samsung device. As Antivirus or firewall may cause interruption during the process.
6. Enable the USB Debugging on your Samsung device or else your device will not be detected by the Computer. Follow the path – ‘Settings > Applications > Development > USB Debugging’. Now, check the USB Debugging option to enable it.
Steps and Procedure How to Install Official Android ICS 4.0.3 XXLPJ firmware on Samsung Galaxy SII
1. First of all, you need to download XXLPJ firmware zip file package from here. Name of the file is I9100XXLPJ_I9100XXLPJ_OXA.zip and size will be 376MB.
2. Extract the zip file into your Computer using WinRAR (or extract the zip file where ever you like in your Computer but remember the path where you have extracted). Once extracted the zip file you will get 5 files GT-I9100-MULTI-CSC-OXALPJ.tar.md5, I9100_CODE_I9100XXLPJ_CL140368_REV02_user_low_ship.tar.md5, logo.png, MODEM_I9100XXLPJ_REV_02_CL1105553.tar.md5 and Odin3_v1.85.zip.
3. Now extract the Odin3_v1.85.zip file and Run the odin3 v1.83.exe from your Computer.
4. Turn off your Samsung Galaxy S II phone and restart it in Download Mode. Press and hold the Volume Down Button, Home Button and Power Button together till it shows the Android image inside the triangle.
5. On the other side connect your Samsung device to your windows based Computer using USB data cable. On connecting your phone and Computer together while Odin3 tool open, you will see a message with highlighted yellow colour added to it in the ID: COM port. This implies that you device has connected to Computer successfully.
6. Then, click on each tab and select the corresponding files to their fields. you can also check below image
PDA: I9100_CODE_I9100XXLPJ_CL140368_REV02_user_low_ship.tar.md5
Phone: MODEM_I9100XXLPJ_REV_02_CL1105553.tar.md5
CSC: GT-I9100-MULTI-CSC-OXALPJ.tar.md5
8. Once again verify your selection before proceeding. If anything goes wrong your device will be bricked. So make sure that files will placed to their fields.
9. Also, select the option of Auto Reboot and F Reset Time on the Odin3 tool.
10. Then, Click on ‘Start’ button in Odin3 tool.
11. When the flashing process completes, you will find the Passed Green status in Odin and your device will reboot.
Congratulation! Now you have successfully updated your Galaxy S II with XXLPJ firmware – Android 4.0.3 ICS.

How To Install I9100XXLSJ Android 4.1.2 Jelly Bean Firmware

I9100XXLSJ Android 4.1.2 Jelly Bean for Samsung Galaxy SII has been leaked.This version is nearly perfect and stable and it will be officially released by Samsung very soon.

Features in the New Jelly Bean Update
  1. Performance increases
  2. More Stability
  3. Same User Interface as that of Samsung Galaxy SIII and Galaxy Note II
  4. Samsung Cloud Services
  5. New Notifications Bar
  6. Google Now
  7. Additional Widgets from Samsung Galaxy SIII
  8. Direct Call, Smart Stay and Pop-up Play Features
  9. 2 Home screen modes
Firmware Details:
  1. Android Version: 4.1.2 – JZO54K (Jelly Bean)
  2. PDA: I9100XXLSJ
  3. CSC: I9100OXXLS1
  4. MODEM: I9100XXLS6

Download

How to Flash:


  1. Back Up your Data
  2. Unzip the file downloaded
  3. Open Odin 3.04 Put your galaxy SII phone in download mode by pressing and hold these keys together:Volume Down + Home + Power.A Warning! screen will show up; press Volume Up key to continue to enter Download Mode
  4. Connect Your phone to PC now and wait untill you get a yellow sign
  5. Click the PDA button in Odin and browse to open the CODE_I9100XXLSJ.tar,Do not make any other changes in Odin and make sure the Re-Partition option is not selected.
  6. Click the phone button in Odin and browse to open the MODEM_I9100XXLS6.tar,Do not make any other changes in Odin and make sure the Re-Partition option is not selected.
  7. Click the CSC button in Odin and browse to open the CSC_HOME_OXX_I9100OXXLS1.tar,Do not make any other changes in Odin and make sure the Re-Partition option is not selected.
  8. Now press the start button to begin the flashing of firmware,when the flashing is complete your phone will automatically reboot,plus, you’ll get a PASS message (with green background) in the left-most box at the very top of Odin.
BY DOING THIS YOUR MOBILES WARRANTY WILL BE VOID.

Install Official Android 2.3.6 XWKTM Firmware

Now we have simple tutorial how to Install Official Android Gingerbread 2.3.6 XWKTM Firmware update manually on Samsung Galaxy Ace S5830. Samsung Galaxy Ace S5830 recently got a Galaxy SIII like ROM. But Galaxy Ace users who are not interested in rooting their device and using Custom ROM rely over Official Firmware. It looked like Samsung has forgotten some of its Phone that is out of top notch league but they have entertained Galaxy Ace user well with the new Android 2.3.6 XWKTM Firmware. It doesn’t matter from which region or country you came from, every Galaxy ace users on the globe can install it very easily. We came with a detailed Tutorial that will help you with upgrading Galaxy Ace S5830 to latest Android 2.3.6 build if you have missed the OTA update or Kies. You will need to flash the firmware using Odin. We suggest a full device backup before you go ahead.
Pre-Requisites:

1. The Methods and steps mentioned in this guide are only for the users who own original Samsung Galaxy Ace S5830. Please do not try these methods on other model of Samsung like Galaxy Ace S5830I or any other device.
2. You should charge your device so that there is at least 70% charge with your device, to assure that there will be no Power interruption during the process.
3. Please backup all essential data’s on your phone, as these data’s might get lost during the process.
4. Disable all security programs like Antivirus and Firewall from your computer and uninstall the same from your device.
5. Enable USB Debugging in your Samsung Galaxy Ace S5830 from the path “Settings > Applications > Development > USB debugging”. The option of USB Debugging should be ticked.

Steps and Procedure Upgrade Samsung Galaxy Ace to Android 2.3.6 Official update:

1. Download Odin flashing tool from here and XWKTM 2.3.6 firmware update package for Samsung Galaxy Ace from here to your PC. Extract all the downloaded files your PC. In 

2.  Open Odin application and reboot your phone so as to enter it in Download Mode. For this you need to Press and hold Volume Down + Center Ok + Power buttons together for few seconds. Once you see below image android robot in triangular field then you can release the buttons.
3.  Now, connect your phone to the PC via original USB cable. On successful connection you can see that the ID: COM section in Odin has turned Yellow color.

4. Click on “OPS” button the select Cooper_v1.0.ops” and then tick mark it. Now go to “One Package” option choose the “S5830XWKTM_S5830OXXKT3_S5830XWKT7_HOME.tar.md5” file from your PC.

Make sure that you must tick mark all three options One Package, Auto Reboot and Protect OPS. See the below image you will get clear idea.
5.  Now, click on “Start” button to begin the flashing of the file you've chosen in the previous Step. The flashing process will take 5 minutes or more to complete. As soon as the flashing has completed your phone will automatically reboot and you will get a “Pass” message in Odin.

6.  Disconnect your phone from the PC on successful completion of the flashing.

7.  Once again reboot your phone, this time to enter it in Recovery Mode. You must Press and hold the Volume Up + Power + Ok buttons for a while.
8.  Now, from the Recovery Menu, select Wipe data/factory reset” then select “Wipe Cache Partition” and then select “reboot system now” to reboot your system.

9: Your phone will reboot now. First time booting up may take 5 minutes or more so patient.

Congratulations! You have successfully upgraded your Samsung Galaxy Ace to Official Android 2.3.6. Share your queries with us, so that we can provide you solution for the same.